1. Target Audience – Students in the Bachelor's of Science DAD program at Full Sail University.
2. Materials –
a. Laptop (instructor and students)
b. Projector
c. Printed handouts
3. Objectives – By the end of the project the students will be able to demonstrate the necessary
capabilities to use online portfolio creation tools. They will have the beginnings of
their very own portfolio.
4. Procedure –
a. Sign up for a new account. (Free vs paid.)
b. Create unique portfolio address.
c. Under About tab, edit personal information.
(Name, image, skills, contact info, freelance availability, etc.)
d. Create a new project on the backend page.
e. Add files to the new project.
(Supports jpeg, gif, bmp, tiff, ico, and png images.)
f. Edit the various project details.
(Title, description, client, layout, etc.)
g. Personalize tab, where the look of the portfolio can be altered.
h. On the Projects tab, create a new thumbnail for the project.
i. View the online portfolio, and how it will be shared and viewed.
5. Web 2.0 Tool – Carbonmade.com (allows the simple creation of an online portfolio.)
6. Social Participation/Social Learning – The lesson will take place in a very collaborative manner.
While demonstrating the tool, the students will be working on it at the same time,
providing feedback and guidance for one another.
7. Making Connections – Most college age students have worked with Web 2.0 tools
before, so they will be recalling their own efforts with other tools and sites.
They will also be revisiting past work of theirs, and calling upon their design skills for the
(albeit limited) display customization. The resulting online portfolio will allow the students
to reach out to a much broader audience (potentially the entire world) and especially
the professional world.
8. Create/Produce – Each student will walk away with an online portfolio.
9. Assessment – I will be asking for feedback directly while guiding through the process of
creating the portfolio. There will be a discussion at the end of the project as well.
I will experiment with making this simply a completion project, instead of grading it on a
rubric in an attempt to take pressure off the students and hopefully encourage them to
experiment with it more.
10. Reflection – After the entire process is done, and all questions have been answered,
I will hold a Q&A sessions with the class as a whole, and on an individual basis.
This will allow me to determine how comfortable they were with tool, and give me an
opportunity to see each student's portfolio.
This whole process was fairly enjoyable, as I had fun researching into the different online
portfolio creation is available. It was nice to see the students react positively to
Carbonmade.com, even saying it was the best portfolio tool they had experienced. When asked
if they felt it would be a good thing to introduce to future classes they said yes.
The following video recalls the lecture I provided for the students:
Sunday, March 27, 2011
Saturday, March 19, 2011
PE5 – Carbonmade
 Inside your Carbonmade backend page, you can create your projects simply by clicking the 'Add a project' button. Inside the project it’s simple to add image files by clicking the ‘add’ button (everything is spelled out pretty well for the user.)
This brings up the familiar file selection window, and it only allows the user to select the supported file types. Once the image has uploaded, you can give it a caption, describing what it is.


And it really is that easy to get a free and simply portfolio on the Web.

On a side note, a similar website I found is MyFolio.com. While working with this site, I actually felt it offered more and better options, however it is currently being upgraded, and the ability to publish one’s portfolio is working, thus rendering the site (temporarily hopefully) essentially useless. I will be keeping an eye on MyFolio, and if it begins to function properly, I will probably make the transition to it.
PE4 – Carbonmade
I have begun exploring Carbonmade.com as the Web 2.0 tool to use for my Relevant and Innovative Learning Scenario that I will be doing in my classroom. Carbonmade allows for the easy creation of an online portfolio. I am choosing this because I feel that most of my students would like to have a way to show their work on the Web, but don’t necessarily have the technical know-how to create their own website. As these students get closer to their graduation date, this becomes even more important, and can be a valuable tool for each and every one of them.

Starting on the home page, it’s easy to either sign in if you are an existing member, or to sign up for a new account. On the sign up page I noticed there are two options, a free one and a $12 a month option. For free you get 5 projects and the ability to have 35 total images, while for money you get 50 projects along with 500 image and 10 videos. Obviously the paid option gives a lot more, but the individual will have to determine if he or she feels it is worth it.

I went ahead with the free option, which only requires you to supply your name, email, a password, and to agree to the terms and conditions. At this point you also create the name of your portfolio and create a web address for it (which will always end in .carbonmade.com)

At this point you have created your account and your portfolio, and your ready to get started uploading work.
Sunday, March 13, 2011
BP7 - Google Docs Commercial
The following is a one minute commercial for Google Docs I created using screen captures, ScreenFlow, and iMovie.


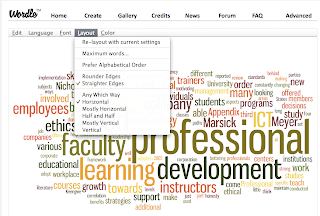
BP4_Wordle & Tagxedo
Today I am discussing another pair of Web 2.0 tools: Tagxedo and Wordle. I have been aware of Wordle for a few months now, and was just recently made aware of Tagxedo. Both of these sites serve the same basic principle; they create word or text clouds. A word cloud is a useful and attractive way to see information at a glance.
 I recently tried out both sites by putting in my literature review from my month one class. It was interesting to see what were the most common words within my paper. There were the obvious ones, like ‘professional’ and ‘development’ (the topic of the lit review) but then it was interesting to see what came next and how they did a fairly good job of summarizing the piece: ‘faculty’ ‘employees’ ‘need’ ‘learning’.

I was thinking I could continue this practice as I write my final literature to help make sure it is staying on topic, and to also make sure that there aren’t words getting needlessly repeated. I really feel this could be an attractive and inviting way to introduce one’s paper (of any kind) to potential readers, especially if there aren’t too many words in the word cloud. It can do a good job giving off the topic and feel of the paper, helping the reader get a feel of what they are about, or even if they want to read it.
In my class, our students have to create a design studio for themselves, and have to write a business description and mission statement for it. I think using these tools could help them more visually see (these are design students after all) their paragraphs, making it easier for them to edit. Also, the resulting design might give them some ideas on how to visually present the paragraphs, as the second step of the project is to design the text into a spread.

 As far as evaluating the two tools, Tagxedo has the one obvious advantage over Wordle, in that it can create its word clouds into complex shapes, representing anything from a tree to a bird to even a person’s face. However, I prefer Wordle’s interface a little better, feeling it a little more streamlined, making it a little easier and faster to use. Tagxedo at first seems to have more options as they appear in single box labeled Word Options, but the more I work Wordle, the more I find I am able to do pretty much the same things.
So I like both services, but feel myself gravitating towards Wordle, unless of course I want the shape options of Tagxedo. Oh, and here is this blog post in both services:


Saturday, March 12, 2011
PE3_iMovie
Yay! I got a certificate!

Overall I enjoyed the tutorial and learned some things from it, and look forward to implementing my newly found knowledge. However, there was one thing in particular I wanted to learn that was not even addressed, and I have not been able to locate this information elsewhere. I want to know if the picture-in-picture window can be resized to a different aspect ratio that that of the overall project. This is one thing that has caused me some headaches on projects in the past; if anyone has the answer on this I would love to hear it.
That's it, I'm off to iMovie it up!
P.S. I'm officially over "Acoustic Sunrise"
PE2_iMovie
I was definitely excited to see what advanced features the Lynda.com tutorial had in for me, and it did manage to show me a few new tricks.
First off, pinning audio tracks to a specific point on a video was pretty neat, and something I could see as having potential use for me in the future as I love working audio into my pieces.
 The ducking feature for audio is going to save me a lot of time and headache. I've noticed it in the program before, but for whatever reason never thought to give it a shot. Instead I've been fighting with audio levels of music and the video file, and doing a lot of manual work, including creating duplicates of audio files and just in general trying to get that exact effect. Now I won't have an trouble hearing the subject of my videos over the audio I put in.
 On the other hand, something I have played with is the precision editor, although I wasn't really sold 100% on it, often relying on other methods to edit my projects. The tutorial definitely offered some clarification on it, and while I'm still not sure that I'm quite there with it, but I will keep working with it and see if it delivers for me.
Working with the additional features, the mapping feature is pretty cool, and could really come in handy with helping to make the connection with the user just where exactly the picture or video are from. Playing around with it I was fairly impressed with the various locations offered within it's database. This would be perfect the personal vacation, but also could be used in an educational setting.
 As someone who has worked with DVD creation software before, the chapter markers that can be exported to iDVD seems like a very useful feature. Adding chapters in DVD software isn't always the most precise action, and can be easy to overlook. Thinking of it as part of the editing process only seems to make sense to me.
 And finally, the ability to export directly to your MobileMe gallery seems awesome to me. That's a very powerful tool that makes it very easy to share your videos, and gives you a lot of options in the process. This is something I will certainly be looking into.
First off, pinning audio tracks to a specific point on a video was pretty neat, and something I could see as having potential use for me in the future as I love working audio into my pieces.


Working with the additional features, the mapping feature is pretty cool, and could really come in handy with helping to make the connection with the user just where exactly the picture or video are from. Playing around with it I was fairly impressed with the various locations offered within it's database. This would be perfect the personal vacation, but also could be used in an educational setting.

PE1_iMovie
Today I come to you with a series of posts about my time learning iMovie '09 on Lynda.com.
I have a decent amount of experience with video editors in general, and have been using iMovie pretty extensively since beginning this online degree program, so I wasn't sure how much there was for me to learn, especially in the early parts of the lesson. Fortunately I came away from it with some new knowledge of the program.
 First, I was interested by the option to simply archive footage from a digital camera without having to actually import it into an iMovie event. This might be nice if I just want the footage, and don't have the need to do any edits to it.
I was also unaware of the ability to turn off the audio while skimming through the filmstrips in the windows. In general I have found that I prefer to have this feature turned on, but I could see it coming in handy at specific moments.

I was aware of what the "zoom" slider at the bottom right did, but not exactly. I was glad for the clarification on what exactly it is doing (that number is how many seconds are represented by each still in the filmstrips.) In addition, I'm pretty sure I already knew about the slider at the top left to control the size of the thumbnails, but it was a nice reminder.
I didn't know you could split and merge events so easily; that's a nice feature to have in case you make mistakes any where along the line.

The ability to print events and projects is a very interesting feature. This could be very beneficial if you're working with or for someone else and you want to show them an easy to read and understand breakdown of the video, particularly if you can't get the actual video to them.
I was so excited to the see the swap button! I can't believe I never noticed or tried it before. I don't know how many times I've wanted the main project track down in the bigger bottom section so that I could see more of it at once. This feature I will be using.

I was also happy to learn I can create folders within the project library. Turns out I can even create subfolders, meaning I can drastically clean up my library, making it easier to manage.

Saturday, March 5, 2011


BP2_Google Docs
Today I am discussing a Web 2.0 tool that we just started using in our class this month. This month is our first attempt at incorporating Google Docs into one of our assignments. One part of our students’ second project is to create an infographic. In order to help them prepare for this, their first project is to research and analyze existing infographics. This project is set up to be done in groups, with the members finding what they feel are successful infrographics (and sometimes examples of what not to do) which they then break down and articulate what principles of design are present, making it that good example. After this work has been done, they compile everything together in a presentation format, and then, as a group, give this presentation to the class.
Up until this point we allowed them to do this using whatever method they chose. However, we decided it was a great opportunity to look into an emerging technology and trend. Google Docs are a wide variety of document types, including word documents, spreadsheets, presentations, and drawings that are created within a web browser using Google’s web based software, and then saved on Google’s hardware. This means any computer with Internet connectivity can access them. Once the initial user has created the document, he can make it public for anyone to view and/or edit, or he can invite specific people via email. At the point any of these people can edit the document, even simultaneously, with all the users seeing each other’s edits in real time. This means not all participants need to be working on the same computer, or even in the same room.
We utilize the word document and presentation for use in the project. The word document allows the students to post their findings for one another to see and discuss with each other. The presentation obviously allows them to create the actual presentation of the material. This way everyone is sharing their information as well as taking part in the creative process. Also, when it comes time for the actual group presentation, it is a rather easy process; the students running the slides can simply log into his Google account from the instructor’s computer, which is already connected to the projector and speakers, as well as being hard wired into the network for a (hopefully) speedy Internet connection.

We had good success with our first run through of the project using Google Docs. It’s still obviously very early and we only have this one month to go one, but there did seem to be an increase of quality in the students’ work and in their attitude towards the project. I think Google Docs really helped with this as it allowed the students to work as a group in a more comfortable setting, and also the students seemed interested in learning about something new, as most of them had little to no experience with Google Docs. One student he found it really neat that one night he added his information, and then when he woke up the next morning there was new content present. Moving forward, we will continue to use Google Docs as part of this project. One additional step we are looking into requiring will be to require the students’ add the instructors to the list of people who can view and edit the document. We are thinking of doing this primarily so that we can access the revision history of the document just to ensure that all group members have taken some part in finding, sharing, and creating content.

Thursday, March 3, 2011
BP1_Welcome to my blog
Hello world,
This blog was created in my Emergent Technologies In A Collaborative Culture class as part of the Education Media Design & Technology Master of Science degree program at Full Sail University online. I will be using it to communicate my thoughts on multiple subjects throughout this course, and hopefully throughout the rest of the degree. I look forward to sharing information with my classmates, instructors, and all other readers.
Enjoy the ride through my mind.

_Kris Knof
Subscribe to:
Posts (Atom)